Fun with food colouring


I joined a really nice spinning group a couple of weeks back, and it has motivated me to spin about 23 hours a day. While I’m fleece obsessed and on a little fleece dyeing kick, I’d thought I’d show the popular easy peasy food colouring method that I use on combed top. (As usual, not exactly a tutorial, just a description of the way I do stuff.) 
The results are vibrant, and there are the major benefits of no really toxic chemicals or fumes, no mask, and being able to use normal kitchen utensils.
Oh, and economy. One bottle of food colouring: $1.06. One packet of dye: $10-$15.
This method also works for dyeing yarns, and there are some great YouTube videos on getting special effects like ombré and gradients. 
Me, I just reeeeeeeeally like rainbows. And then spinning the top fractally. Which apparently is not a word according to spell check, but spinners will understand what I mean. 


I use combed top, but carded roving works too. This is fine merino (19.5 micron) from Nundle Woollen Mills. I like to buy from them: their top is gorgeous, but mainly I like saying the word ‘Nundle’. I don’t use super wash wool, so have to be very careful not to felt it.
I braid it first, as it makes a nice tie-dye sort of effect. If you haven’t done this before, all it is is a crochet chain that you make with your hands. Make a slip knot at one end and chain to the other end.


I use these food colourings, because that’s what the supermarket had. But there are many types. I bought colours like pink and green, but of course just the primaries, red, blue and yellow are all you really need to make virtually any colour using basic colour theory.


I bought some sauce bottles from a discount shop just for ease of use (and so I feel like a super professional dyer). 3 for $2.50. But a jug works too. You also need white vinegar.
I’m not great with taking measurements, being a kind of intuitive (lazy) crafter. But I would say about 1/2 cup of vinegar in a kitchen bowl, the rest filled with water. Then soak the braid in the solution for at least 2 hours. One drop of detergent may be added if the braid is extra water repellent. 


When you’re ready to dye, mix them up. I wear disposable latex gloves for the dyeing part.
I use about 1-2 teaspoons of food colouring to one cup of water and one teaspoon of vinegar. Roughly. This might require a little experimentation, I tend to just wing it. The colour that the fleece goes on application is not exactly indicative of the finished product, which makes the whole thing even more exciting! 🙂 You can dip a little paper towel in the dye mix to check your colours too.


Incidentally, I have kept the mixed dyes and used them days later, and they still work.
Obviously I’m using grey top here, I like how it tones down the vibrancy of the food colouring.
Lay cling wrap along a bench. I use two thicknesses. Drain the braid. I wrap it in a towel and stand on it to soak out excess water. Don’t rinse it or let it dry out completely.
Lay it on the cling wrap, and paint it with dye! I trickle the dye on and press the wool gently with my fingers until that section seems completely saturated in the dye. Check that it has made it through to the back. Repeat until all done. (You have to kind of trust the colours you mixed up, as they don’t look too awesome on the fleece at this stage.)


Fold up the cling wrap over the braid once or twice, fold the ends it, and keep rolling to make a sausage. Roll it up loosely like a Swiss roll and put it in a microwave safe bowl.


The heat setting component can be done on the stove, in a crock pot or even in a hot car apparently, but I use the microwave because I am impatient.
Microwave on high for about two minutes. It should be piping hot, if not, do it for a few more seconds at a time until it is. Let it stand for a few minutes. Microwave on high again for thirty seconds. Let it stand again. Do one or two more 30 second hits/few minutes standing.
That’s all I do. If there is any liquid in the bottom of the bowl, it should be very close to clear. If not, the dye is not exhausted and it will need reheating.
It is hot, so I leave it to sit for a few minutes, then snip off the end of the cling wrap sausage and pour the fleece out.


Yay! Rainbow!
I don’t want to shock it, so I use very hot water to gently rinse (careful not to felt it), blot in a towel and dry.
That’s it. 


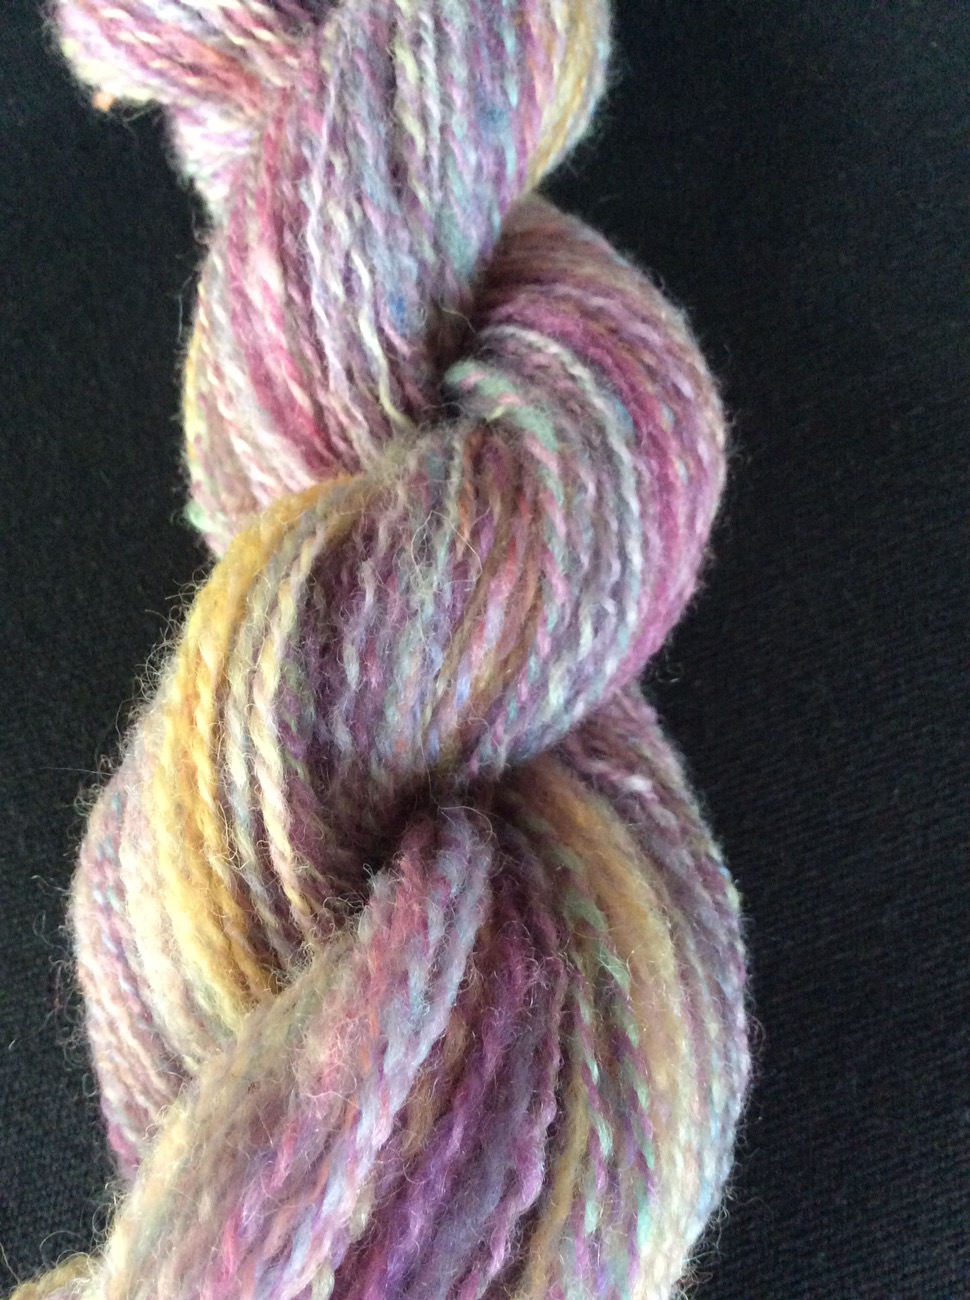
Here’s some spun up. (Yup, I totally painted one of my spinning wheels gloss black, for no obvious reason. M calls it the ‘Morticia’ wheel now). 


And here is some chain/Navajo plied and crocheted into a slouchie hat.


B 🙂

An Australiana Sock Experiment


A couple of weeks ago I was fortunate enough to find and quickly snaffle another second hand spinning wheel on Gumtree, which is a free online classifieds site in Australia. Spinning and knitting aren’t exactly big things here in tropical Queensland, so it can be difficult to track down a bargain. Wheels are often listed at twice the price they are down south! I had been on the lookout for one for a while. My own little wheel couldn’t cope with the variety of yarns I now want to spin.
But I digress…this post is actually about the local fleece that was thrown in with the wheel, unwashed but packed extremely neatly in a box with the label ‘X breed from Howard’. I do so love a bit of random fleece! Because it isn’t precious, you can experiment.


I had been thinking about making my own handspun socks from scratch for a while now. There are plenty of sites that examine this in detail, so I won’t elaborate too much. I played with this fleece, and discovered it would suit the purpose. But I wanted stripey socks, and this fleece was all white.  
I have chemical dyes but…nah, where’s the challenge in that? 🙂 I decided these would be 100% Aussie socks, local fleece dyed with local plants. I was determined only to use natives from our property. I knew from previous experience they would make a variety of yellows, so I figured…sunshine socks!
With a few tips from this book…


I got down to it. This was SO MUCH FUN! It is chemistry, art and craft combined, plus later there was even maths! Squee! 🙂
Firstly I scoured the fleece in small batches. Then I tried the vegetation that doesn’t require a mordant – lichens, staghorn fern and some eucalypts. The whole house smelt like koala breath (eucalypts) and cheap aftershave (lichens). (NB you should really do this outside. Do as I say, not as I do.) 


The colours were very pretty, and the lichens in particular were amazing.


Lichens grow very slowly and can easily be wiped out of an area if you over-harvest, so I only got very small amounts from around Ravensridge. These three were the main ones I collected.


Then I tried a variety of foliage after mordanting the scoured fleece with alum.


Different types of gum leaves, banksia cones, grevillea leaves, bracken fern fronds, casuarina bark, paperbark, stringybark. This produced lots of shades of yellow, plus tans, oranges and pinks, and a slightly greeny-yellow I got from a native grass. 


I kept my usual meticulous notes regarding weights and volumes.


It all began to look like a sunrise. I then made another mordant using vinegar and old rusty bits of iron from the train. With yellow stringybark leaves and bark, it made the fleece the most luscious purpley grey. 


I decided to save that for another project though, and stick with the ‘shades of yellow’ socks.
I now had fourteen shades. I had figured I would just spin it, ply it and knit it. Um…yeah. But how much of each colour? How thick would the finished yarn be? How long did I want my socks? It will surprise no one to learn I hadn’t thought this through at all. So now came the maths. I weighed out little sections of coloured fleece for each sock, leaving a bit extra for waste from combing. I figured I would make the socks look like a paint chart, and keep a list of which plant produced each colour for posterity.
Then I combed each section carefully using my Majacraft mini combs and arranged them in a colour scheme. 


I used my old handmade wheel to spin (worsted, short forward draft with lots of twist) and chain/Navajo ply. 


It took a few days to do this. In the end I got two skeins, 170 and 172m respectively. Could have been worse.
Finally done and drying on the line.


So for the socks, I used 56 stitches on 3mm double pointed needles. I used the Fish Lips Kiss Heel as usual. But I did do these toe-up to make sure the toes were the lightest colour. I just reversed my usual vanilla sock pattern.


The completed Sunrise Socks. 


I don’t seem able to get one photo that actually shows the true colours though! This one is closest.


I’m very happy with them. Except that the bits I dyed with lichen STILL smell like cheap aftershave! 🙂

B

Route 1 and a trip to market

The sun peeked through for a trip to the market last Sunday. This is the drive to the Southside markets at Gympie, all taken on the go through the car window. Zoom zoom, life is too short for stopping apparently! It’s a bit of a drive, so we left at 6:30am.


Mango farm in our road


Macadamia nut farm at the end of our road.


Views over town


Court house


Lots of old miner’s cottages in Gympie.


Straight ahead you can make out Gympie hospital, and just to the right with the steaming chimneys is the Nestle factory, producing International Roast coffee. 😬


Over the river


And the market.
It’s a pretty good market. In the past I have purchased furniture, puppies, chickens, a kindle, fruit and vegetables here. This trip we just got sweet potato, a picture and a woollen coat.

So far in this oddly warm winter we’ve only had two wood fires. Atticus, for one, clearly enjoyed them. Toasty feets…


And speaking of toasty feets, more socks of course. Another boring grey pair for M that I didn’t bother to photograph, and a chocolatey pair for me. I’m putting some little flowers around the tops of these.


I’ve never purchased sock blockers as they seemed expensive and pointless. But when you’re constantly photographing socks, they begin to have some appeal…so I asked M if he could make me some. He said ‘draw a picture’, so I did. 20 minutes later he emerged from his shed and handed me these, out of recycled Perspex sheet.


What a legend. 🙂 He wanted to put holes in them for faster drying, but so far that has proven unnecessary. 
So then, in the spirit of pushing my luck, I said…you know what I’d reeeeeeally like? An e-spinner. (For the non-spinners, this is an electronic spinning machine, very handy if you have bad joints). They are expensive (very). And M said ‘show me a picture’. So I did. 
‘I can make you that’, he said. ‘Okay,’ I said. Yay!! I will keep you posted. 🙂
I’ve been spinning a lot, and I do mean a lot. Inspired in part by the acquisition of a pair of Majacraft wool combs, which make fibre preparation so much more fun than boring old carding. 


😀 SO FLUFFY!!! 


Practising two ply, 3 ply and chain plying. 


I also finished my Route 1 by Norah Gaughan. This is the second of these I’ve made, it’s a free pattern, a quick knit and a useful style for in-between weather. The yarn is Bergere de France’s ‘Recycline’.


Year of William Morris update: tapestry has resumed with the assistance of adjustable tapestry stand that means I can now lounge and stitch at the same time. 🙂


But for now, back to the wheel! 
B 🙂

Flagellation Shawl

I showed a glimpse of this shawl last week. 
It is Ilvy by Berniolies Designs, and a streak of masochism had me crocheting it on a 3mm hook out of coarse Swedish weaving linen that had been gifted to me. 


It was painful, frustrating and yet kind of enjoyably medieval. Despite several alarm bells, I stubbornly persisted.
A week later it looked like this, a heaving, hard, tangled lump of flaxen knots.


It was scratchy and shrunken in on itself and altogether unpleasant. As I completed the single crochet short rows at the top, it also became heavier and heavier and I sighed at my grievous error in yarn choice. But I had once again underestimated the awesome power of blocking. 
Be free, shawl, be free!! 


I love the finished shawl. And the pattern. I know I will wear this to death. I have already purchased another of this talented lady’s designs, Oswin, which I’m planning to do in a silky laceweight.

I also thoroughly enjoyed my birthday celebrations last week, and received a veritable mountain of beautiful handmade gifts! 🙂 Feeling very spoilt! Here are a couple:
M made me a treasure box full of goodies, plus this butterfly for the garden from 100% recycled materials.


He’s called ‘Crazy Eye’. 🙂


Scissor case and keeper made by my gorgeous mum.


A cedar window from my poppy, which he designed himself and carved from a single piece of wood.


Birthdays in our family are always a good excuse to make something. Next in line is Poppy, who will be 81. And I think I may have finally found a sock yarn that he won’t find too ‘scratchy’! 🙂
B

Socks, spinning and FOs


The first sticker I have ever put on my car in my entire life. But I couldn’t resist. 🙂 
Apologies in advance for the rushed photos this week. Also WordPress seems to be deleting people from my feed. 😡 I will find you again!

Our perfect Queensland Autumn continues. The zygos are flowering

Frogzilla the gigantic tree frog has taken to hiding from the antechinus in the watering can.


The cats’ heated bed came out of storage. It was much appreciated.


In related news, the stash has been expanding proportionately to the gradual drop in daytime temperatures here in the Southern Hemisphere. 
I have never held myself back from casting on a new pattern or having countless WIPs. There is too much joy in riding that first inspirational wave of creativity like a body surfer to stifle it. But lately I’ve noticed that nothing much was getting finished this year, and nineteen projects were languishing in project bags. This in itself didn’t bother me, but the fact almost all my good needles and large quantities of lovely yarn were tied up did. So with M’s assistance, I frogged fourteen projects. It felt really good. 🙂 And now with the extra yarn freed up, my stash is practically exploding out of the train! Joy!
I have been charging through the socks to make way for new skeins, a pair for me in my favourite Lana Grossa Meilenweit India, 2.5mm needles, 60 stitches…


Another pair of boot socks for M in Drops Big Fabel…5mm needles, 40 stitches


And a squishy pair for Mum for Mothers Day in Berocco Vintage (can’t remember needle size)


Then I cast on these in Lana Grossa Meilenweit Solo Cotone, my first pair of cotton socks, 3mm needles, 52 stitches. The jury is still out, they feel a bit floppy to me, but we’ll see.


All of these socks have Fish Lips Kiss Heels. I have lately heard people complain about this heel, saying it pops off? I have to say that’s never happened to me, nor anyone I’ve gifted it to. Still my favourite heel by far. Last year I knit a pair of socks with one fish lips kiss heel and one traditional heel flap in a Bendigo Woollen Mills sock yarn. They looked like this:


And here’s how they look a year later after fairly heavy wear and constant machine washing (cold):


There is no apparent difference in the wear, if anything the fish lips is wearing slightly better. I won’t be giving it up anytime soon. 🙂
I’m doing a few blankets at the moment for Angel Blankets, who donate blankets to hospitals for stillborn or miscarried babies that can be held (14-23 weeks). The tiny-ness is a bit heart wrenching. I’ll be adding some pretty borders to these.


Some more crochet cable mitts. I do enjoy crochet cabling. I think a fisherman sweater is forming in the back of my mind.


M also requested a khaki jumper (shock!) and it seemed a good way to clear some yarn, 2000m of it to be exact. A simple crochet pattern by Melissa Leapman was chosen, and only a few days later, it was finished. I would NEVER have picked this for him, but he loves it. You just can never tell, hey. 


I’ve already started another for him. 


Yes, as requested that is camo yarn. No, I have no comment on that. Whatever makes him happy. 🙂
My Year of William Morris paused as I hurt my back and couldn’t sit at the tapestry stand (I’m pretty sure it was actually sitting at the tapestry stand that hurt my back in the first place) but it is nearly healed now and I’ll be back into it. In the meantime, my Auntie did bring me a lovely related gift on her recent trip up here from Adelaide.


Christmas Village Mark II is progressing nicely. Four buildings so far and the fifth and sixth underway. 🙂


And spinning…something about the cooler weather always makes me break out the wheel! I don’t know what this fibre is, I am guessing merino. It is part of a large bag of fleece my mother-in-law rescued from an op shop where it was being thrown out. It is sooooooo soft and floofy! I’ve never spun anything so light and fine before, and I’m very happy with it. Two ply laceweight, 220 metres. 


Then some rainbow something from the same stash, not as floofy and a bit old and felted, but I pressed on regardless. Another couple of hundred metres in 2 ply.


Then some chocolatey Corriedale. I like this one the best. 🙂 This came out a sportweight as a 2 ply. I have a couple of kilos of this fleece to process, so plenty for a jumper or three. I’ve only ever made one jumper from yarn I spun, and it was a plain cardy from our old alpaca, Patch. I might do something fancy with cables this time.


Of the other five current WIPs, this is my favourite, Ilvy, which I just started:


Crocheting pure linen thread is hard on the hands, but I love the result, so rustic. Poppy made me the little cedar stand for the reel of linen. 🙂
Hopefully I can now resume normal broadcasting and return to some sort of blogging rhythm after the erraticness of the last few weeks. Next week I turn the big 4-0, so a fresh start, a new decade and soooo many things to look forward to! 🙂 Or I’ll just let myself go completely, I haven’t decided yet.

Bit busy

Life has been a little hectic of late at Ravensridge, with major work changes and M away at a couple of conferences. Where are the months going? I can’t believe that a year ago this week we were climbing the Eiffel Tower and watching the sunset over Paris. 🙂

    
This week we have goannas climbing gum trees instead.


 This week’s projects – 
Madrona Cardigan by Rohn Strong. Not sure how this one is going to turn out, will have to see how the sleeves look.

    
2 X ‘Over the Willamette‘ shawls, which I had to make after seeing Karin’s at Pointe Shoes Punk Rock and Purl. These only take a few hours, lots of fun! (Details on my rav project pages.)


A little birdie told me that a set of my favourite Knitpro crochet hooks was winging its way to me courtesy of the lovely M, and I couldn’t bear the thought of throwing them all in a pencil case with the others. So, knowing there were fifteen in the set (fifteen! Oh the joy! :)), I set about making a case for them. I am pleased with the end result.

(Incidentally, a lady at the Brisbane Craft Fair last year told me to put clear nail polish on the size so it doesn’t rub off, and it proved a good tip.)


 A Year of William Morris update:
The peony tapestry cushion has been such a joy to stitch! I’m about two thirds done. I almost don’t want it to end. 

  
And a William Morris cross stitch has been started…this is called ‘Peace be in this House’. I’m not a lover of cross stitch, but I couldn’t resist the design or the sentiment. 🙂

  
I’m also in the process of planning a William Morris quilt. Incapable of directly following a pattern as I am, this will certainly be a hybrid, and will include ravens.

Christmas Village Mark II:

So…..as promised, I gifted the original Christmas Village – with a little pang, I must admit – and set about planning the next one. I wanted it to be sturdier than paper this time, so I had the idea of using model train scenery. 
I did some research and chose HO gauge and started looking for little houses. Well, if you know me at all, you can probably guess what happened next. The simple Christmas Village in my head has now exploded into a full blown model train layout, and my plans include over a dozen buildings, lake, mountains, Christmas market in the town square….you name it. Oh, and of course a train. I had no idea the model train thing was so frickin HUGE, particularly in the UK but also here. And now, I am becoming one of them. I shan’t be wearing a tracksuit nor growing a beard, but I have inadvertently stumbled upon a whole community of my own miniature-loving kind!
I’m doing it all arse-about, as for me the train is secondary to the landscape. So I started with buildings. I got my first kit on eBay for 99c. I didn’t know at the time, but this is a pretty complicated sort. There are over ninety metal extras plus the houses. The first one took a week of evenings to complete. I am using Tamiya model paints and Piko glue. I am particularly pleased with the curtains, stripe linen in the lounge and gingham in the kitchen. 🙂 (The pen is to show scale.) Weathering and the ‘Christmassy’ aspect will be added later, when I have more of the village completed.

            
I have picked up 8 buildings so far, and will slowly work my way through them. 

  
In the meantime I am gathering supplies for the build and reading railway modelling magazines, sometimes into the wee hours, which M finds hilarious. (Yeah, go ahead and laugh it up, Chuckles. You’ll be wiring the whole thing up for me.) 🙂 
B

A Year of William Morris

It is finally feeling like Autumn, and we all breathe a collective sigh of relief here at Ravensridge. The body language of this koala says it all. We had actually never seen one sleep like this before, and I could empathise after the summer we had.   
It’s a magical time of year, beautiful, cool, sunshiney mornings and plenty of wildlife. Lots of koala spotting, wallabies and goannas hanging around my train while I’m working, and some black cockatoos. 


Atticus enjoying the sun.

  
Dougal enjoying unconsciousness.

  
Even the cacti garden flowered this year.

  
And dragonfruit threatens to take over the entire garden.

  
The wasps are also going crazy artistic in this weather. Most of the ones round here are stingless, including the mud dauber that built this on the laundry wall. I can watch them for hours sculpting with their little blobs of mud. (We don’t normally remove them, this one was just in an unfortunate spot and had to go).


I have of course been knitting and crocheting madly, which I will document next time. I am currently obsessed with Tunisian crochet. Crochet that looks like knitting! It makes me very happy. 🙂

  
I have also been enjoying more sewing and needlework. And in that line, my mum came up with an idea for herself that I am totally stealing. “A Year of William Morris”: a year of projects related to the art of William Morris and the Arts and Crafts period. Instead of always looking through the books saying ‘oh I’d love to do one of these one day…’, I decided I’m going to actually do some. 
When I gathered up my relevant books from all over the house and the train for inspiration, it became obvious this had been on the cards for a while.

  
Of course, this won’t be ALL I do for the next year, but it will be a consistent background theme. I have plans for cushions, a rug, a fire screen, a painting, cross stitch pieces and at least one quilt. After the summer hiatus, I’ve also resumed designing and am feeling very motivated! If anyone would like to join the journey, please do! 🙂 There can surely never be enough William Morris projects in the world. 
For Ravensridge, this one is of course on the list, ‘Raven’, from Beth Russell’s William Morris Needlepoint. It makes me swoon. I’d like to design a quilt to match, too. And maybe a jacket. 🙂

  
It had been a while since I did any proper needlepoint, so I practised with these projects. I finished my hazelnut cushion and a small rose tapestry, which I also made into a cushion to match the sofa. Both zippered, although I drew the line at piping. I think I was just procrastinating, really.


Finished a ‘cottage and manor’ cross stitch duo. These were from a vintage kit I got on ebay. They are suuuuper tiny, and were very hard on the poor old eyes. :/

  
And then, feeling warmed up, I started this, Project Number One: Peony Cushion. A needlepoint cushion, an interpretation of William Morris’ peony design from the book ‘Country House Needlepoint’ by Frances Kennett and Belinda Scarlett. My Year of William Morris is underway! 🙂 

  
B

A Paper Christmas Village (Yes I know it’s March)

FALALALALAAAAAA LA LA LA LA
As a lover of all things Christmas (and quite a penchant for glitter too), this was one of those projects where it was difficult to finish. You could go on forever really, a touch more glitter, a few more beads, another light…but I forced myself to stop. It’s only paper, but this was the most fun I have had crafting in ages. 🙂


I began my village with this kit.

  
This turned out to be great in some ways, and shite in others. For example, the glitter containers included were awesome. They made little ‘puffs’ of glitter that you could control. But the glue that came with it never dried. However that might just be a Queensland humidity thing.
There was also no way it was going to turn out like the picture on the box, which is heavily photoshopped. The upstairs dormer windows and some of the entrances were solid all the way through, unlike the picture, so amongst a few other problems, I had to work out a way to get light to them. Also there are no street lights in the kit.
Before I punched out the houses, I photocopied them all. There are extra templates to copy in the instruction book, but they are to a different scale. Instead, I photocopied all the large ones onto cardboard so that I had extras. I ended up using two of the extras.

  
I also used two buildings downloaded from christmas-village-displays.com, a town hall and a thatched cottage. These had more detail printed on them, but didn’t fit together perfectly and weren’t as three dimensional as the others.

  
I used vellum and a Sharpie for the window panes, and did some stained glass effects using ordinary textas. 

  
Once all the buildings were glued together, I decorated them with glitter from the kit plus my own assorted beads and dried moss. I used PVA wood glue for everything. The pipe cleaner for the wreaths came with the kit. I made one of the pine trees into a Christmas tree.

   
 I used small pieces of wadding for the smoke in the chimneys. I was inordinately happy with how that looked. Note wind blowing same direction. N.B. This is the kind of thing that happens when you don’t have TV. 🙂 I have issues.

  
The book recommended ‘flocking powder’ for a snow effect. I duly bought some on eBay without having the faintest idea what it is. Having used it, I am still none the wiser. It was a bit like asbestos. I threw it out after one try, preferring the glitter. It lives on though, in the form of our favourite new swear word. Eg For flock’s sake, this flocking glue won’t set!

Initially I had intended these houses to be lined up on a mantelpiece with flickering battery-operated tea lights inside them to look like fireplaces. Aaaah, pretty. What I didn’t factor in was that most of the houses are two storey, and an orange, flickering light inside makes them look like they are actually burning down. So rather than a very un-Christmassy replica of the the Great Fire of London, it was back to the drawing board.

I decided to fix them permanently to a cardboard base instead. That way I could run battery operated fairy lights through them. At this stage I thought maybe – just maybe – it was getting a little out of hand for a basic paper village. And it turned out I was right, the base was the most time consuming job overall. 🙂

I had three pieces of old box cardboard the same size. I painted the first board, and added a slightly raised platform for the church out of an old canvas.


I loosely laid out the village and marked the lights placement, then ran them under and through holes punched with a knitting needle (what else?). I made a couple of mistakes, but I patched them with paper. I set it up so there were some lights backlighting the trees and snowman, and a couple front lit, like the Christmas tree.
To hide the wire and make a flat base I did the following – much easier to photograph than to explain.

  
Then I glued the final solid piece onto the base, weighed it down with assorted pots and waited for the glue to try.


After affixing the buildings and the trees, I covered the base with ‘drifts’ of polyester quilt wadding. And just a bit more glitter with a border to neaten the edges.


The Details:
The kit cost $24AUD from bookdepository.com : ‘Build a Christmas Village’ by Leonard Hospidor

It came with:

3 prepunched houses, 1 church and a wildly disproportionate dog kennel which I didn’t use

1 x premade, preglittered tree

6 x prepunched pine tree

2 x prepunched large trees

1x snowman

Prepunched picket fencing

Glitter x 4

Glue x 1

Pipe cleaner x 1

Sheet of vellum

Instruction book

The town hall and thatched cottage were free downloads from: christmas-village-displays.com

10 sheets 280gsm white cardboard for photocopying/printing extra houses- $6.75AUD on eBay 

Flocking powder (unused): $2.30AUD on eBay 

Things I used that I already had:
PVA wood glue

Cardboard

White paint

Stanley knife, metal ruler, bone folder and cutting mat

Sharpie and coloured textas

Beads

Polyester wadding

String of battery operated fairy lights

Small art canvas

Dried moss

Colour printer/photocopier 

For anyone else contemplating this, I say go for it! It was so much fun! 🙂 I worked on this for a few minutes up to an hour most days over a period of two weeks. My main tip would be to fully complete each stage before you go on to the next (eg build all the houses before you start decorating any of them). Also have a dedicated work space set up just for this project so you can leave things to dry (and where you don’t mind there being a lot of glitter). It would be far too hard to pack it up each day.
In the end, I am very happy with it. It will probably be a gift for someone sans cats. I am already planning another, but a more permanent and realistic model village, such as those used in model train scenery. And I can’t WAIT for Christmas!! 🙂


Crocheting Socks

Ever wanted to try crocheting a sock? Yeah, me neither. But sometimes you just need to live life on the edge, man.
I like knitting socks. I’ve knit upwards of forty pairs (having put that in writing, I’m thinking I perhaps need to get out more). And I’ve pushed plenty of people, such as the delightful Mary Tang, into trying it too, for better or for worse. 🙂

  
But I was interested in trying a different effect and texture. So I just did an online course in how to crochet a sock. I also thought that it might be a quicker option than knitting them and might give a nice thick sock for boots for the next trip to Finland. 

I pretty much expected to skip easily through the pattern. Yeah, nope, that didn’t happen. The ‘basic sock’ pattern which accompanied the course – which is an e-patternscentral course by Rohn Strong – involves using foundation double crochet, front and back post stitches for the ribbing and extended single crochet. Wtf. It isn’t that hard, but none of these I would consider basic. The foundation double crochet in particular needed heaps of practice to get smooth. There was a LOT of frogging and swearing going on at Ravensridge over the weekend.
One of my first attempts, using Lana Grossa Meilenweit India.
  
The first few tries came out way too big following the pattern and suggested hook size, so I eventually gave in and decided to swatch. I finally got gauge with a tiny 2.5mm hook instead of a 3.75mm as suggested. Weird.
A further attempt with a different yarn just felt awful and dense and scratchy. This is Drops Fabel Long Print.

  
So I went back to a tried and true Australian yarn, Bendigo Woollen Mills sock yarn. The colours are not me, but it worked. 🙂 Right size, nice fabric feel, and I’ve got the hang of the stitches now.

  
Another benefit to the crochet version is being able to easily try it on as you go.


The finished sock fits well and stays up. It’s hard to take photos of socks on your own feet. 


I really like Rohn Strong’s designs, and the course presentation was fine, although there’s a couple of numerical errors in the accompanying printed pattern.
Will I crochet more socks? Well, at least one more, to go with the one I’ve finished. It uses more yarn to crochet them, as you would expect, but makes a nice dense fabric, and now I’ve got the hang of it I think it will actually be much faster than knitting. So I would say…yes. Yes I will. Next up I’ll probably try some for M as he only wears boot socks. And knitting a size 14 on 2.5mm needles? Ain’t nobody got time for dat. Not even me. 
B 🙂

February No-FO’s 

Well, I sailed cheerfully into February with high hopes to use this month to complete my unfinished knitting and crochet projects, which are -ahem- numerous. As it turned out however, life had other plans.
My ‘Finish it or Frog it’ plans hit a couple of snags very early on in the month with temperamental health and an unexpected funeral, the combination of which took the wind completely out of my sails. 
My February tally so far:

Finished – 0

Frogged – 0

Yep. Nailed it.
But c’est la vie. 🙂 Now the breeze has slightly picked up again, I have been really craving cheerful colours. I finished a little sewing, firstly a purple linen dress. 

  
And some Thai silk cushions to brighten up the lounge, made out of vintage serviettes my MIL rescued from an op shop for me. 

  
More bags for sale, including sock knitting kits.


In the knitting/crochet arena, I’m still working on my yellow cardigan, known variously as the pineapple, banana or mellow yellow cardy. It is, in fact, almost a finished object. But it needs pockets. And possibly a collar. The pattern is Quick Sand by Heidi Kirrmaier and the yarn is Rowan Creative Linen. I even did this huge gauge swatch. So proud.


My grandmother’s flower garden blanket is growing and growing, my Japanese crochet top is coming out too small so I’ll have to add a few more rows along the way, and I’m also crocheting the Vermillion Cardigan, from Inside Crochet magazine, out of Drops Lima. Only the sleeves and buttons to go. I’m hoping it will come up nicely with a good blocking.

  
Oh and I crocheted this simple ear flap hat too, not quite finished, but nearly. 

  
I went to make a Pom Pom for it from cardboard (haha, I love that Pom Pom is automatically capitalised), and remembered that I had a Pom Pom making kit when I was a child. I had a vague memory of seeing it somewhere in the train last year and went searching….. 

  
Woohoo! Even with all the bits inside still! 🙂 this is exactly why I don’t throw any crafty stuff away. So satisfying. In yo’ face, people that call me a hoarder!! 🙂 
I have two projects in the current issue of Handmade magazine, a journal cover and a lace hat…

   
 In my hunt for the Pom Pom maker, I also uncovered a pile of cross stitch and tapestry and long stitch kits, collected over the years from various sources who were throwing them out. I have never actually bought one. People give me a lot of stuff. Usually with the line ‘I want you to have it because I know you’ll finish it.’

  
Whoops.
But I have lately, in my confinement to extended periods of inactivity, been desirous of comforting, old fashioned embroidery-style projects. This one appealed to me, a lovely little Australiana cottage which reminds me of our place. And a cross stitch tapestry cushion cover of a hazelnut bush. These things are so kitsch, I just love them. It is essentially colouring in with yarn and I find it extreeemely relaxing. 🙂


 Around Ravensridge…Our baby shrike thrushes in the hanging basket hatched, grew and flew the nest.


A typical Queensland huge summer storm threatened to hit us, but passed by quickly slightly to the north of us with only light rain. Phew.

  
The summer rain has brought out a scattering of fungi.


And I received a lovely ‘Valentine’ from M, Scrivener writing software for my new computer. Ironically, I am in love with it. Totally. In love. Where have you been all my life, Scrivener? ❤
And I mustn’t forget this, a little cheer up present from book depository. I am So. Excited. To make this. :)))

  
There will be FO’s next time. I swear. 
B 🙂